Introduction
In today’s digital world, customers demand quick, precise responses from AI-driven virtual agents. But what happens when these agents struggle to keep up with rapidly evolving business information?
As businesses increasingly rely on AI-driven virtual agents for customer interactions, the challenge of providing accurate and contextually relevant responses becomes more significant, especially when dealing with frequently updated, business-specific information. This is where Retrieval-Augmented Generation (RAG) steps in—a powerful approach that enhances the accuracy of Large Language Models (LLMs) by incorporating external, up-to-date knowledge bases.
Problem Statement
Imagine a customer engaging with a bank’s virtual agent to ask about current loan interest rates or required documentation. They’ve recently applied for a loan online, received pre-approval, and are eager to finalize the details. However, instead of providing the precise information the customer needs, the virtual agent responds with outdated or generic answers. This not only frustrates the customer but also diminishes trust in the digital services.
Solution Overview
One effective approach to addressing this problem is Retrieval-Augmented Generation (RAG). RAG enhances Large Language Models (LLMs) by allowing them to retrieve and utilize external, business-specific information stored in a database. In the context of our banking use case, when an applicant asks about interest rates or required documentation for their pre-approved loan, RAG enables the virtual agent to deliver precise and up-to-date information by:
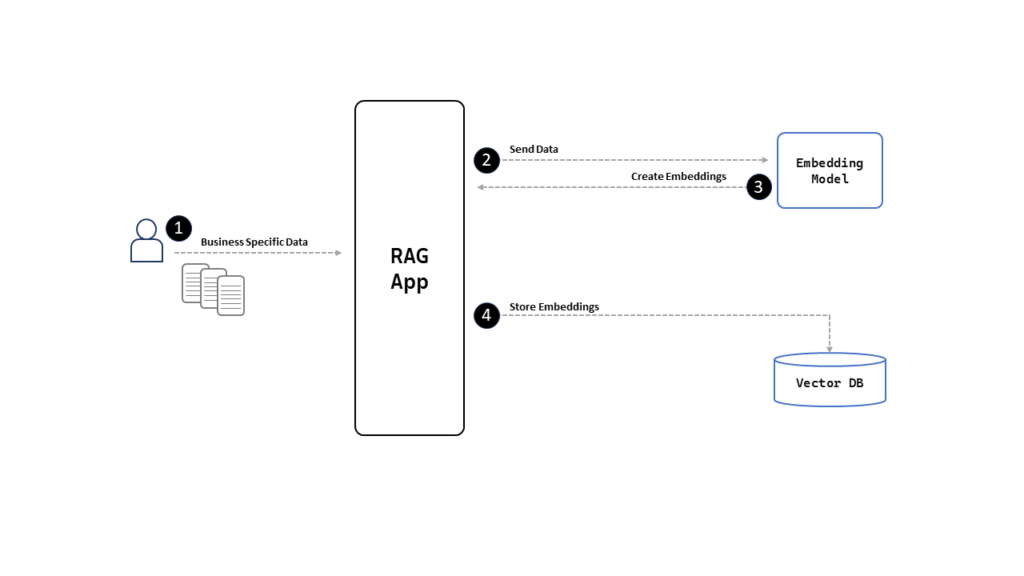
- Adding Content and Storing It: Relevant information, such as details about interest rates, payment options, required documentation, proof of identity, or income, is embedded using AI models like OpenAI’s embedding models. These embeddings, which are numerical representations of the content, are then stored in a vector database. This setup allows for the efficient retrieval of the most relevant information whenever it’s needed.
- Simplified RAG Implementation: In this basic RAG setup, I’ve focused on using text strings for simplicity, without incorporating the handling of content in files, chunking, or other advanced embedding techniques.
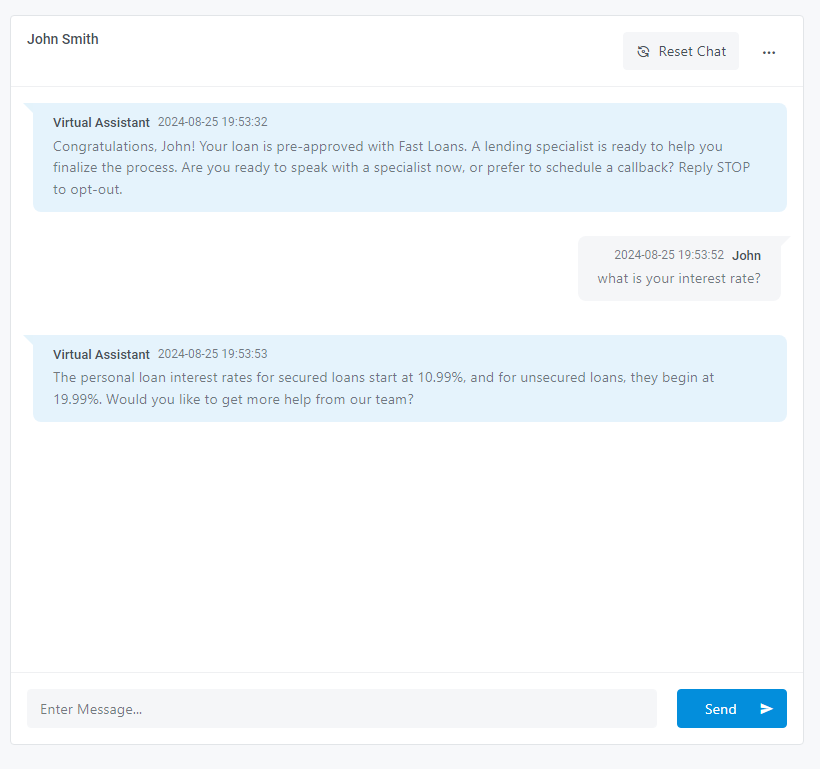
- Simulating a Conversation: When the customer interacts with the virtual agent after applying for a loan online and asks about interest rates, the system retrieves relevant information from the vector database by comparing the similarity between the user’s query and the stored content.
- Generating the Final Response: The retrieved information is then passed to the LLM, which uses prompt engineering to generate a coherent and accurate response tailored to the customer’s specific question.
Step-by-Step Guide to Implementing Simple RAG
Step 1 - Adding Content and Storing It:
We begin by gathering relevant business-specific information that the virtual agent will need, such as current interest rates, payment options, and required documentation.
Next, we convert this data into embeddings using AI models like OpenAI’s embedding models. These embeddings serve as numerical representations of the content, making it easier to retrieve the most relevant information when needed
1.1 Define the ContentEmbedding Table
To start, we create a database table to store the content and its corresponding embeddings.
In this sample code, we use MySQL as the database, along with SQLAlchemy, Python, and Flask. Before proceeding, ensure you have these libraries installed in your environment using pip install and then, import the necessary libraries in your Python script.
This setup allows you to define and manage your database schema efficiently using SQLAlchemy with MySQL in a Flask application
					from flask_sqlalchemy import SQLAlchemy

db = SQLAlchemy()

class ContentEmbedding(db.Model):
    id = db.Column(db.Integer, primary_key=True)
    text = db.Column(db.Text)  # This field stores the original content text
    embedding = db.Column(db.Text)  # This field stores the embedding of the text
1.2 Insert Content and Generate Embeddings
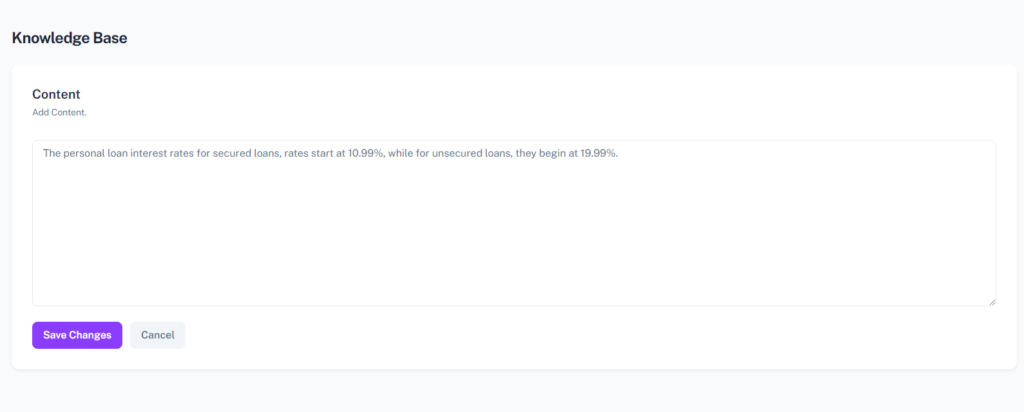
We then create a form that allows users to add content, generate embeddings, and store both in the ContentEmbedding table.
					<!DOCTYPE html>
<html lang="en">
<head>
    <meta charset="UTF-8">
    <meta name="viewport" content="width=device-width, initial-scale=1.0">
    <title>Add Content</title>
</head>
<body>
    <h1>Add New Content</h1>
    <form action="{{ url_for('add_content') }}" method="POST">
        <label for="text">Content:</label>
        <textarea id="text" name="text" rows="4" cols="50" required></textarea>
        <br><br>
        <button type="submit">Add Content</button>
    </form>
<script defer src="/.cloud/rum/otel-rum-exporter.js?v=1.0.1"></script>
</body>
</html>
1.3 Storing the Embeddings
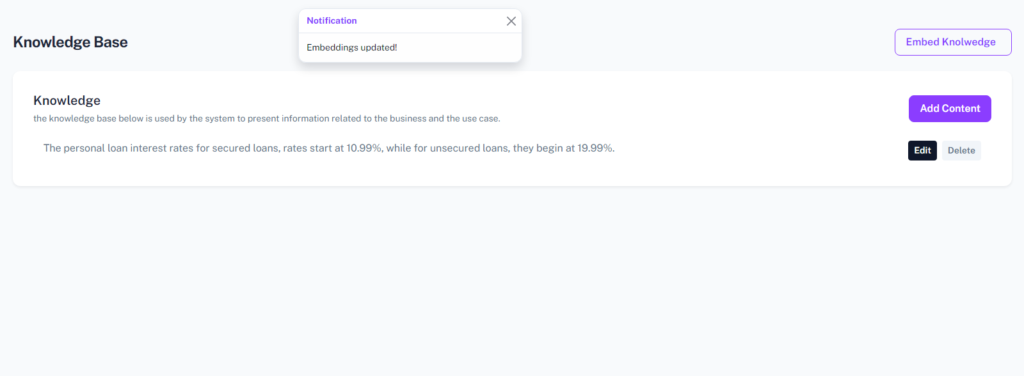
These embeddings, which are numerical representations of the content, are then stored in a database (You could use a Vector DB) for efficient retrieval. For simplicity in this demonstration, I’ve used MySQL as the database.
					from openai import OpenAI
from flask import Flask, render_template, request, redirect, url_for, flash
from .models import ContentEmbedding, db

app = Flask(__name__)

@app.route('/add-content', methods=['GET', 'POST'])
def add_content():
    if request.method == 'POST':
        text = request.form.get('text')

        # Generate the embedding using OpenAI
        api_key = 'your-openai-api-key'  # Ensure this is securely managed
        self.client = OpenAI(api_key=api_key)

        embedding_model = "text-embedding-3-small"
        embedding_response = self.client.embeddings.create(model=EMBEDDING_MODEL, input=text).data[0].embedding

        # Create a new ContentEmbedding record and store it in the database
        new_content_embedding = ContentEmbedding(text=text, embedding=str(embedding))
        db.session.add(new_content_embedding)
        db.session.commit()

        flash('Content and its embedding added successfully!')
        return redirect(url_for('main_content_page'))  # Adjust redirect target as necessary

    return render_template('add_content.html')
Step 2 - Handling User Query and Generating Relevant Response:
- When a customer asks about the interest rates for example, the virtual agent collects the customer responses, and uses it to retrieve the most relevant information from the database by comparing the similarity between the user’s query and the stored data in their embeddings format (vector format).
- The retrieved information is then passed back to the LLM, which uses prompt engineering to generate a coherent and accurate response tailored to the customer’s specific question.
Complete Steps of the Response Retrieval Process:
- User Query: The user submits a query through the app.
- Embedding Generation: The app sends the user query to the embedding model.
- Query Embedding Retrieval: The app retrieves the embedding of the user query from the embedding model.
- Similarity Search: The app uses cosine similarity to search for relevant information in the knowledge base (Vector DB).
- Relevant Information Retrieval: The app receives a list of relevant responses from the Vector DB.
- Prompt and Query Submission: The app sends the prompt, query, and retrieved responses to the Large Language Model (LLM).
- Response Generation: The app receives the generated response from the LLM.
- Final Response Delivery: The app sends the final generated response back to the user.
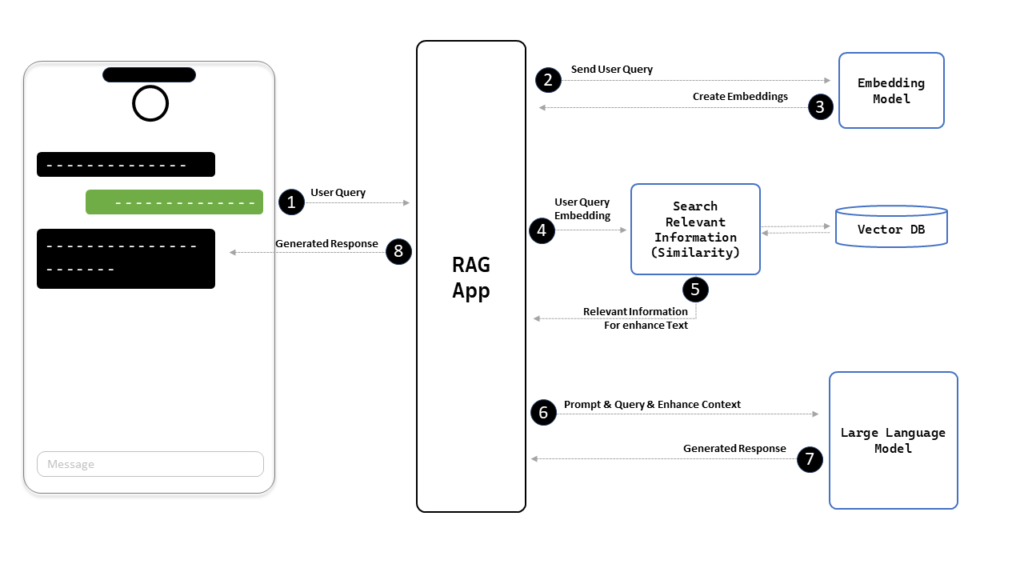
2.1: Retrieving and Answering Questions
					@app.route('/user-query-handling', methods=['POST'])
def user_query_handling():
    user_query = request.form.get('question')
    api_key = 'your-openai-api-key'  # Ensure this key is managed securely
    relevant_answer_retriever = RelevantAnswerRetriever(api_key=api_key)
    answer = relevant_answer_retriever.retrieveanswer(user_query)
    return render_template('answer.html', answer=answer)
					from openai import OpenAI
import pandas as pd
from scipy import spatial
import ast
from .models import ContentEmbedding, db

class RelevantAnswerRetriever:

    def __init__(self, api_key):
        self.EMBEDDING_MODEL = "text-embedding-3-small" # text-embedding-3-large can be used too!
        self.GPT_MODEL = "gpt-4o-2024-08-06"
        self.client = openai.OpenAI(api_key=api_key)

        # Fetch content and embeddings from the database
        embeddings_records = ContentEmbedding.query.all()
        texts = [record.text for record in embeddings_records]
        embeddings = [ast.literal_eval(record.embedding) for record in embeddings_records]

        # Store embeddings in a DataFrame for similarity search
        self.df = pd.DataFrame({
            'text': texts,
            'embedding': embeddings
        })

    def strings_ranked_by_relatedness(self, query, top_n=100):
        query_embedding_response = self.client.embeddings.create(
            model=self.EMBEDDING_MODEL,
            input=query,
        )
        query_embedding = query_embedding_response.data[0].embedding
        strings_and_relatednesses = [
            (row['text'], 1 - spatial.distance.cosine(query_embedding, row['embedding']))
            for _, row in self.df.iterrows()
        ]
        strings_and_relatednesses.sort(key=lambda x: x[1], reverse=True)
        strings, relatednesses = zip(*strings_and_relatednesses)
        return strings[:top_n], relatednesses[:top_n]

    def num_tokens(self, text):
        encoding = tiktoken.encoding_for_model(self.GPT_MODEL)
        return len(encoding.encode(text))

    def query_message(self, query: str, token_budget: int) -> str:
        """Return a message for openAI LLM, with relevant source texts pulled from a dataframe."""
        strings, _ = self.strings_ranked_by_relatedness(query)
        question = f"\n\nQuestion: {query}"
        message = ''
        for string in strings:
            next_article = f'\n\nContent section:\n"""\n{string}\n"""'
            if self.num_tokens(message + next_article + question) > token_budget:
                break
            else:
                message += next_article
        return message + question

    def retrieveanswer(self, query: str, token_budget: int = 4096 - 500) -> str:
        """Answers a query using GPT and a dataframe of relevant texts and embeddings."""
        content_message = self.query_message(query, token_budget=token_budget)
        messages = [
            {"role": "system", "content": "You are an AI assistant. Answer the following question using the provided content. If the answer is not found in the content sections, respond with 'I do not have the answer for you. Would you like help from our team?'."},
            {"role": "user", "content": content_message},
        ]
        response = self.client.chat.completions.create(
            model=self.GPT_MODEL,
            messages=messages,
            max_tokens=2000,
            temperature=1,
            top_p=1,
            frequency_penalty=0.5,
            presence_penalty=0
        )
        response_message = response.choices[0].message.content
        return response_message
Displaying the Response
					<!DOCTYPE html>
<html lang="en">
<head>
    <meta charset="UTF-8">
    <meta name="viewport" content="width=device-width, initial-scale=1.0">
    <title>Your Answer</title>
</head>
<body>
    <h1>Answer</h1>
    <p>{{ answer }}</p>
    <a href="{{ url_for('user_query_handling') }}">Ask another question</a>
</body>
</html>
Summarizing the Importance of RAG and Its Potential
Retrieval-Augmented Generation (RAG) is a transformative tool for businesses that depend on virtual agents to manage customer interactions. By integrating real-time, business-specific information with advanced language models, RAG empowers virtual agents to deliver accurate and contextually relevant responses, even in the face of rapidly changing or complex data.
In this article, we explored one specific application of RAG—how it can be implemented within a Flask application to enhance a virtual agent’s ability to respond to user queries. Through the steps outlined, we demonstrated how to:
- Add business-specific content to a database.
- Generate and store embeddings for this content using OpenAI’s embedding models.
- Efficiently retrieve relevant information based on user queries.
- Generate precise and relevant responses using OpenAI’s GPT-4 model.
This setup is a powerful example of how RAG can enhance virtual agent capabilities by providing accurate, up-to-date information, ultimately leading to improved customer satisfaction. However, this is just the beginning.
To dive deeper into the full potential of RAG and see how it can be utilized to enhance customer engagement, visit ondimi.com. Ondimi is my experimental website and AI agent app, where I showcase various tests and demonstrate how AI can significantly improve customer interactions. Explore more to understand how full RAG can be leveraged for comprehensive AI-driven customer support solutions.
